This is my project development and documentation page, for the answers to the questions that we are supposed to answer as a part of 'project development' assignment, go to the
bottom of the page.
SPARKY The Electrical Discharge Machining PCB Mill
The name explains everything, doesn't it?
If not let me show you a video that was captured during the first week of Fab Academy. I was trying to see if the technique works, (well, I know it works, but I have to show you that
it works, thats why the video!).
In case if you haven't figured it out yet, this is basically a PCB milling machine, but the material removal is achieved with spark erosion.
How?
Anyway the process is very simple, as we all know, sparks are not good, most of the time, as it corrodes. But here we are using just that, the corrosive nature of the sparks, I'll be
trying to tame the 'devil' and use to for good. By controlling the parameters of the sparks, the quality of the erosion could be controlled; parameteres such as frequency
(number of sparks per second), voltage, current (or in better words charge-flow/energy per spark) etc. to control the energy deposited per area, per time. The energy/(area
x time) or power/area determines how much material we are going to remove. Also the sacrificial electrodes diameter plays a big role, just like the diameter of CNC router
bits.
Here the sparks are not made in an air gap, instead water bath is used. It acts as a dielectric, a coolant and as a cleaning agent which cleans the work-area of eroded metal. Without
the water as a coolant we cannot have high energy sparks without it affecting a large area, this means that if we don't use water as a coolant we cannot mill thin traces
as fast as we want, without the trace being lifted off, or burned, or vaporised.
I will be connecting one end of the power supply to the PCB and the other end to a thin wire which will be the 'milling bit'. This electrode also erodes as the process progresses, so
this wire has to be supplied from a spool of wire and need to be extruded via something like 3d-printer head/extruder.
The tip of this wire and the PCB will all be submerged in water. The wire will be kept just above the copper to be removed and when the supply is activated, with the right
voltage and the right spacing the electric field intensity in the water between the wire and the copper will be so high that the dielectric will break down, sending a short
pulse. This pulse will remove material from both the wire and the copper.
Since the wire also erodes in the process, I'm thinking about using titanium or molybdenum wires as they have high melting point and are highly durable.
Also, since the water used will not be deionized, it will have conductivity. Even if deionized water is used, the process generates chemicals/metallic compounds that spoil
the water.
The point I'm trying to say is that since the water will be slightly conductive, there will be electrolysis and this process will remove the material from the +ve/anode.
Hence the copper (workpiece) will be connected to the ground/cathode, hence no material will be removed from the workpiece, though some may get deposited.
Merits
If I could do this machine as I 'dreamed'.
Can have extremely close tracks which is impossible with the conventional milling machines in the lab.
This is a new technique for PCB machining, at least I couldn't find one.
Eco friendly, because no chemicals, no dust, but there will be eroded metal and metallic compounds, especially that of copper in water, which may not be that harmful
This machine could be used for drilling tiny holes in metal, any metal, hard, soft, tempered annealed doesn't matter.
This may be useful for cutting metal sheet, for example to make a stencil from a soda can for applying solder paste.
Can be used for making tiny metal gears.
And finally, no broken bits anymore!.
Draw-backs
Even if this project is implemented correctly there will be drawbacks, like
Slow speed machining.
Chances of electrical short and shock (especially since water and electricity comes together), but it's will be relatively safe as we are not dealing with mains level
of voltages.
Messy, there is a water bath and water circulation system included.
Consumes more power than other PCB milling, may be, I have to confirm this.
As mentioned above, the problem of electrolysis effect erroding the toolo wire.
Since the process requires electrical connection to the site being machined, the gcode/tool-path generation will be slightly complicated. This is because we cannot machine
an area which has been electrically isolated by a previous pass.
The machine cannot cut or drill the PCB (substrate), so you will have to manually drill and cut the required area from a larger piece of copper clad board.
Very intolerant to even the slightest of surface imperfections and leveling errors.
Some of these draw backs could be fixed, for example we can add a separate end-effector for milling, which could be mounted on a servo arm, like the Auto Bed Leveling setup as seen
in
this youtube video or
here.
In fact I could fix the uneven surfaces and wrong leveling of the bed by adding an automatic bed leveling setup. Like what is seen in the following video.
well, technically it's not bed leveling, because we are not leveling the bed. We are actually profiling the surface (in very low resolution), in another words, we are '2.5D
scanning' the surface and moving the end-effector up and down according to the surface profile.
The Rough Idea
The EDM process
The end-effector will be something like a 3D printer extruder without the heater.
X-Y axis movements will be done using
core-xy. Or will be a simple X-Y movement assembly.
The end effector will also act as a probe for profiling the surface of the PCB for the 'auto-bed-level' function.
There could be a separate spindle (on a servo arm) with a drill bit for making the via.
A water pump and filter for circulating and filtering the water.
An additional power supply with/without a capacitor bank will be required for the machining process. The power-source may need to be of variable voltage and variable
frequency, though variable frequency could be done easily with a switching MOSFET.
To-Do
Decide the approximate voltage and current level, and/or the capacitor values to be used
Make the end effector, which should extrude/retract thin wires of the order a fraction of an mm. The extruder will have to supply the power to the wire too.
Almost all of the parts required like the control-electronics, Stepper motors and drivers, tungsten/molybdenum wires etc are sourced already.
The mechanical parts like pulleys, couplers, threaded/smooth rods, gears etc has to be salvaged or made or sourced from local/online vendors.
The overall assembly need to be designed and made using acrylic.
As a first step, I tried contacting
Jarrett, whom I mentioned in my
Applications and Implications page.
To my surprise he responded quickly with a lot of details, like the troubles he faced, his ideas and he briefed me about his work till now. He also shared a few external
links and threads.
One of the difficulty he faced is the design of a wire extruder. So I decided to start working on that itself.
The wire Feeding Mechanism.
The wire feeder should be able to feed the thin wire and simultaneously supply connect it to the +ve rail of the power supply. I was thinking about a click pencil mechanism or a normal
pinch wheel mechanism. I decided to stick with the pinch wheel mechanism as it seems simple.
The idea is to use a rubber wheel found in the paper feeder unit of a printer and a 608/606 bearing. I talked about us getting a few printers from the 'scrapyard' for salvaging parts
for our
Mechanical Design assignment. All the rods and many other parts for this project will also come from the salvaged components of the printer.
I used the 626-2RS bearing and the rubber wheels from the printer. Made an assembly using acrylic to make a nice compact wire feeding mechanism.
As you know, the
red lines are the cutting lines and the
black lines and fills are the engraving area. This engraving will create a small surface depression that allows the bearing to run freely. The
second piece will be sandwiched between two of the first type. A piece of 6mm shaft will be used to mount the bearing and 4 screws will mount the sandwich to
the stepper motor.
Download the design files
here.
Refer to the picture above, one piece of he part on the left and two of the other is required.
All the three pieces cut and ready to assemble. The center piece has holes drilled into it, manually, to allow the wire to pass through.
Also the Laser Engraving didn't work as expected it to, in first trial it just went through the boundary in the other it didn't go that deep. Since I didn't want
to waste those I just took a Dremel to fix it. The two acrylic pieces in place, and the bearing is secured using a piece of the 6mm smooth rod I found from the printer. Everything mounted and ready for a test.
Test
The video shows the wire feeder in action. The controller is the result of my
Input/Output assignment. As evident from the test, the result is a smashing success. The grip is very good, I can even pull on the thin copper wire to make the stepper
rotate, thats how good the grip is.
As a bonus, this mechanism also straightens the wire, unintended, but awesome!. The only problem is feeding the wire, as of now I have to disassemble and insert the wire and assemble it back.
The CoreXY Stage
Ever since I heard about
CoreXY and H-bot, it looked very interesting ans I always wanted to make one. Now that I need one, I'll do it now itself. But I had to decide between the CoreXY and
H-Bot, The link in the beginning of this paragraph helped me decide that. The physics says that there is an inherent flaw in the design, the mechanism produces a torque
that flexes the entire stage, this happens during certain motions.
I used reference from
http://corexy.com/ and many other forums, to come up with my design. I'll be using 6mm acrylic for the construction, as that's the stiffest material that I could find
out of what were available in the lab. I have also made the design with the dimension of the smooth rods I have eith me. There are two left from the 'scrap-hunt' during
the
Mechanical Design week. Also there were two more 30cm smooth rods with Puneeth, which he agreed to lend me for the time.
So here is the design I came up with.
I have shared all the required files with the 'uncut' rhino file to my
google drive. These includes the full Rhino file, the dxf for laser cutting, and stl's for the 3D printing.
I can now laser cutr the oarts required for the coreXY. There are three parts to be 3D printed, a few parts like the bearing to be casted in babbitt metal.
Unfortunately I don't have any pictures during the laser cutting and only a very few for the assembly. From my past experience I have learned that too tight of a press-fit is not the
ideal choice for acrylic. The material is too brittle. The best option for acrylic is to have an exact fit, not too tight or loose, then use a solvent like acetone to bond
the pieces together, this will bond them seamlessly. Next best choice is the cycno-crylic glues, super-glue.
As I said there are a few 3D printed parts and a few cast parts, the procedure is the same as in
Moulding and Casting assignment. In fact I will be making four of the plain bearing I made in that assignment, along with a few Babbitt metal idler gears. For which
I made a new and improved mould, but they still didn't work as expected, they aren't smooth but each of them need a bit of sanding to get a smoother outer edge. Without
this they are not performing well, I later used a
thingiverse OpenSCAD file to make a profile of a matching pullery and laser cut in acrylic.
The idler pulleys are made by 'cloning' the 16-tooth-GT2 pulley meant for a 5 mm nema-17 stepper. SInce the rods I'll be mounting this pulleys are of 6 mm, I need something
which has 5 mm at one end and 6 mm at the other, this is required only for making the silicone mould.
I made a reducer shaft (from 6 mm to 5 mm) using a wooden stick, the drill and a file, a makeshift lathe. Here is the end result. Cast Babbitt metal pulley using the new mould. Making the inner surface smooth and lubricating the pulley.
Here are a few pictures I took while assembling the CoreXY stage
The frame is done, glued using cyno-acrylic glue, didn't use T-slots and nuts&bolts, thought about it initially, then left for the time being.. Testing the CoreXY movement with my stepper driver. This is when I decided to switch over to laser cut acrylic pulleys, the babitt metal had few rough edges in the 'channels'
of the gear tooth. Probably caused by the bubble in the mould. This make the pulley not perfect circle and cause issue, the stages get stuck at times.
The Plotter
With the new pulley, I started testing it, with the help of
RAMPS 1.4 board. I first made a plotter. The RAMPS, was loaded with
Repetier firmware and used the repetier host to send the G-codes. I typed the first test pattern myself.
Which will give the following output as seen in the following youtube video.
Notice that the plots are not in proper scale, I did this for demo purpose, for better visibility.
If you watch carefully you can see some places where the sharp right angled coroners looks like 'fillets'. This is not an error of the machine, rather because of the flexibility
of the pen-refill I'm using. But this could happen with my final product too, not much as there won't be any pressure on the tool wire, it just floats in the dielectric,
just above the copper.
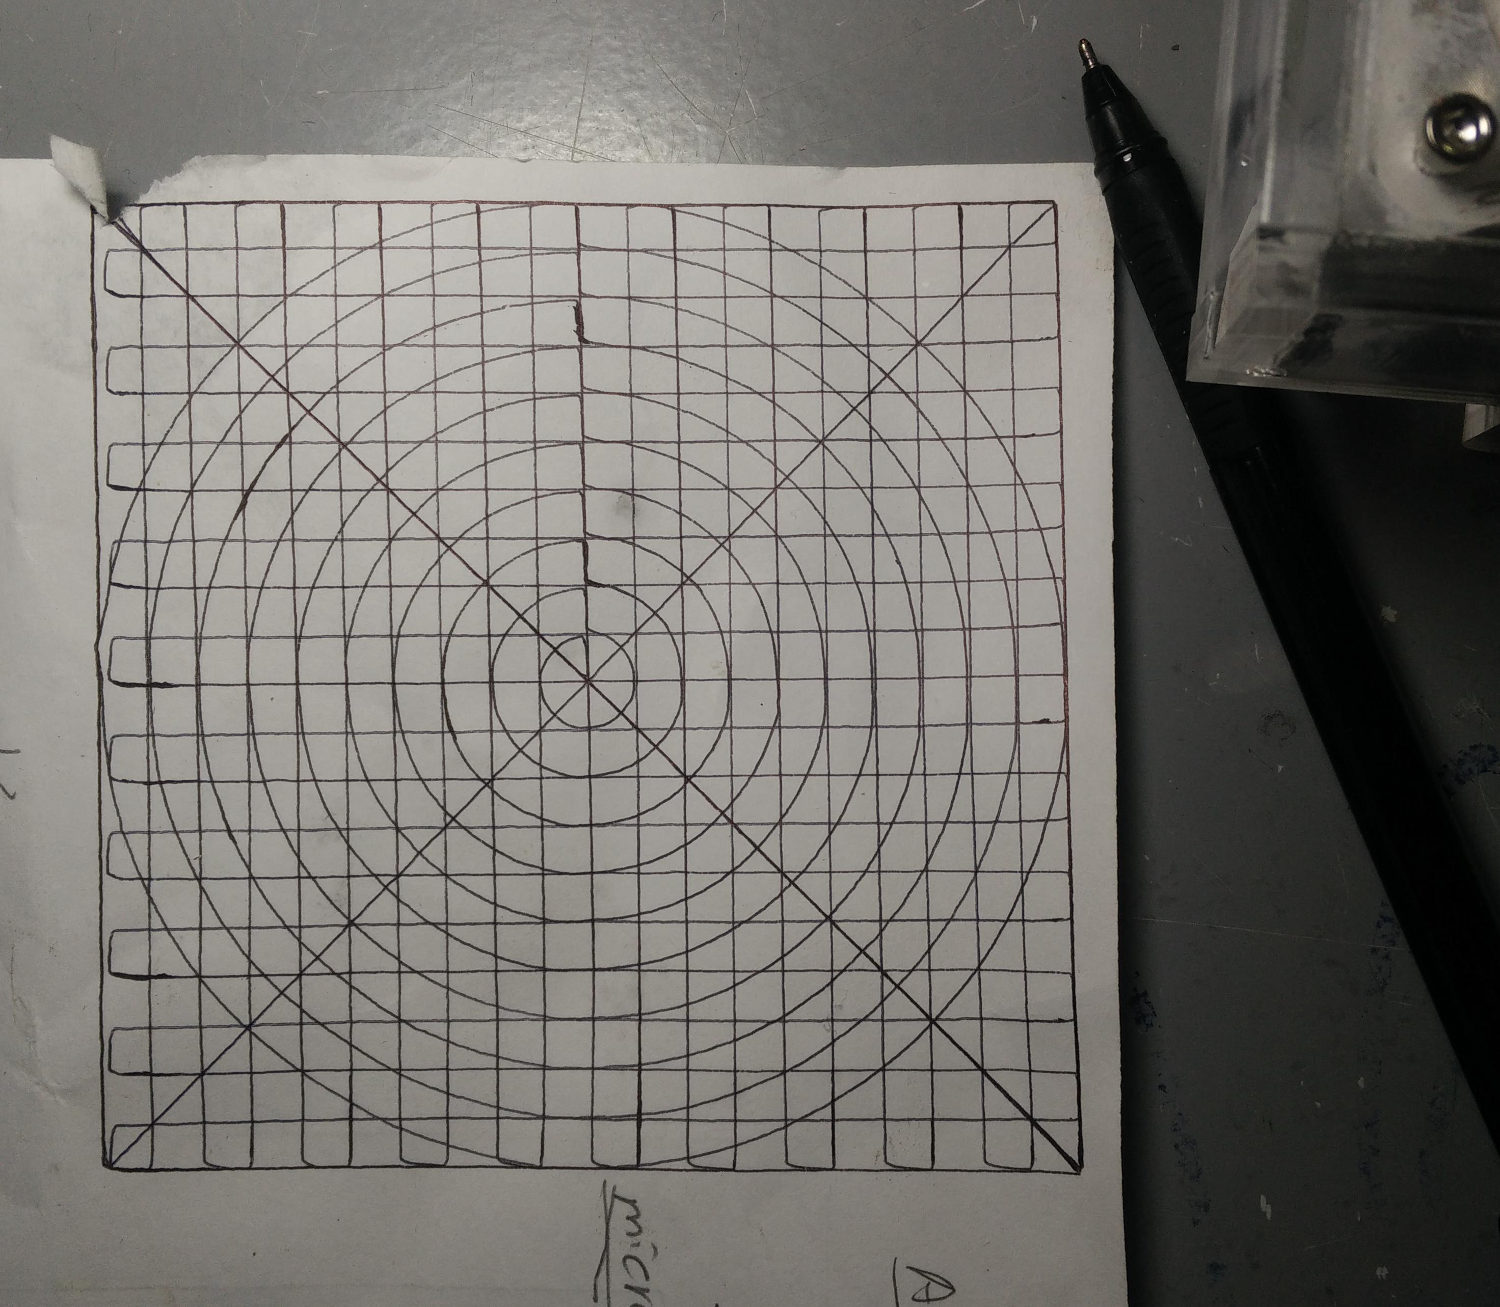
Now that I have a pen plotter, let's just do some complicated plots. With the help of
http://www.makercam.com/ I created a Gcode file which is a 'profiling toolpath' for one of my PCB design. I plotted this too, just because I can, and it looks nice.
Let's Spark It
For the first trial, I re-purposed my stepper-servo-control
, I programmed it with a simple logic. There is a voltage divider network which reduces the voltage difference between the tool wire and the ground to logic levels.
The output of this divider will be higher than zero(value depends in on the gap between the wire and the PCB, more the gap, more the voltage, up to a maximum of the supply
voltage). This voltage is fed to the ADC of the stepper-servo-controller. When the ADC goes low, the stepper should back off as the tool wire is too close to the PCB, perhaps
touching it. If the ADC goes too high, it means that the wire is too far away from the PCB.
I then made a shallow water container using acrylic and hot-glue to seal it. Water is used as the dielectric here. The dielectric is important, without it the spark channels won't be
narrow. The dielectric fluid has a high dielectric constant compared to air. Higher the dielectric constant, higher the voltage required to cause a breakdown at a given distance,
in simple English it means higher voltages are required to initiate spark at a given distance.
This results in a spark that is constarined to a small area, how? The sparks follow a lowest resistant path, electrically closest, usually the physically closest points. Now since the dielectric constant is high the potential required to cause
arcing at a slightly longer path than the shortest, is magnified by the dielectric constant. Which means the probability for the arcing to happen between the physically closest
points are magnified.
The liquid also acts as coolant and a as a cleaning agent.
This idea was supposed to work fine, but it didn't, not a complete fail, but I'm not happy with the results. The wire touches the the copper every now and then, the extrude wheel diameter
should have been smaller. Even with the 16 step, micro-stepping, each step pushes too much wire.
This is when I decided to add a trigger mechanism. The 30V supply from the lab power supply, along with a 2000uF capacitor bank has enough energy to do some erosion on the surface.
But the 30v is not sufficient to cause a breakdown of the dielectric at some practical distance.
The trigger is actually a short pulse of an higher voltage, say 100v. This will initiate the arc and the ionized path will create a conductive path for the low voltage high energy pulse.
The high voltage pulse was originally was created using a rectifier and a filter on an 110 VAC, which will produce about 150v DC. Dealing with mains is dangerous and hence
I decided to make a
Cockcroft Walton Generator.
But for the demo purpose I used the rectified mains only. The pulse was supposed to be controlled by the micro controller (inside the stepper-servo controller) via a MOSFET. But it
wasn't necessary as the voltage multiplier itself was oscillating and was producing the pulses, thjis was due to the fact that each pulse discharges the capacitors in the
generator completely, depleting the voltage way too low to support the arc. Then the next spark will only initiate after the capacitors are charged enough. More the distance
between the PCB and the tool wire, less frequent the pulses were.
Here is a a video of an extremly high voltage genrator using many stages of the Cockcroft Walton Generator, this is not mine, just sharing an youtube video. The video shows
the relation between the freqency of the sparks and the distance.
I'll have to make one of these with two or three stages. Thinking about using a 555-timer, or the micro-controller itself to controls power transistor to make the square wave required
for the generator. Actually it's easy to do it with just the micro-controller itself, will be using only one digital I/O pin, and one of the timers in it.
With all of this setup, I could get some results, the ramps will send a command to the stepper servo controller board to indicate if the head is moving for a cut.
Here is my final project presentation video which also shows the result.
Here are the pictures of a few boards I made for the first trial, this is all crap now. Lot of rewiring, and tweaking have been done on the other side of the boards. Appropriately
modified schematics have been given further down the page. From left
The 'hot-side' control circuit, this is the trigger pulse generating circuit, with it's rectifier, filter capacitor, trigger pulse current limiting resistor and the MOSFET
to control the trigger pulse.
The 'cold side', this board controls the main pulse, has the protection diodes (which keeps the high voltage pulse away from the low voltage side), current limiting resistors
and the MOSFETs.
ANd the last, the capacitor bank, about 4000uF.
Further development
So far I don't have a polished product. But I'm in the process of making one, based on the data so far, I choose a dual micro-controller solution, could be done with a single micro-controller,
but for testing the XY stage and Tool head separately, individual micro-controllers would be beneficial. Also, during my presentation, Neil suggested that the this could
be devolved into a general purpose EDM machine, separating the tool-head from the XY-stage is beneficial for that too.
The Block Diagram of The Electronics of the Machine
Here is the schematic of the MOSFET driver with an isolated power-supply (9v battery in this case). The outputs of this circuit goes to the Gate nad Source of the two
MOSFETs being driven. This section uses PC817 optocouplers and two NPN and two PNP transistors along with a bunch of biasing resistors.The schematic for Atmega32u4 Board. This is board is made standalone, so that I can re-purpose this later, if I need.The module with the drivers for X & Y stepper motors.The control board for the tool-head/wire feeder.
The MOSFET'S will be mounted separately on a heat-sink. For the rest I need to make board from these schematic, mill it, stuff it, test and reiterate if necessary. I am pretty sure
that I'll have to iterate it once more, at at least. But since I made a completely modular design, only few sections will have to be modified at once. Then I'll think about
dropping the modular electronics concept and start designing a single board, single micro-controller solution.
here is a dynamic version, hosted in my google drive, this one is subject to change as I proceed with developing the product further, even after the Fab Academy.
Project Devolopment Questions.
Note that this section is being updated every now and then. Which means the answeres of time related questions are updated with the status of the date of last update.
The last update was on 8th, July, 2016, 23:45 IST.
what tasks have been completed, and what tasks remain?
The mechanical stages has been done.
The wire extruder is done and working.
The 'alpha' stage programs for controlling the tool wire feeder is working.
The technique of using a high voltage trigger pulse is working.
The babbitt metal cast linear bearing is doing a fantastic job.
Has to document everything in detail. Unlike my documentation for all other assignments, this page is of poor quality and lacks many of the key components. Partially
because I have been doing this project under a tight schedule, didn't have the luxury of time that I used to have during the other assignments, each of which had
one week. Now this is equivalent to many of this assignments packed into a tight schedule. There were other tasks too, like finishing a few pending assignments,
fixing mistakes.
The electronics need a lot of refinement, I did it in a hurry, and I'm new to the electronics design area. I came to notice that MOSFETs are driven by V
GS and is not easy to be used as a high-side solid state switch.
So I had to design an entire new and complicated board with opto-couplers and isolated power supply(9v batteries).
The wire feeder need a better resolution, could be done with gears or smaller rubber wheel, also considering a better contact mechanism.
The coding, the tool path creator is remaining
I need to have a polished firmware and circuit.
Has to finalize the variables like, capacitor values, supply power rating etc and decide on the components accordingly, then I have to make the final circuit, one with
no RAMPS and Arduino, a standalone controller for the entire machine. This has to be modular as well.
This task requires a lot of time, and materials and guidance form other people. Lot of reading to be done. I'm in touch with many people in the EDM enthusiast communities.
I'm yet to think about and implement a height map (scanning the surface imperfections of the PCB) generator for precise positioning.
what has worked? what hasn't?
The idea seems to be working. The technique is able to mill the PCB. But it's no where near perfection.
The CoreXY stage.
The rudimentary circuits to test the idea.
The Babbitt metal cast pulley failed.
The initial circuit with no isolated MOSFET drivers failed, had a blown MOSFET.
what questions need to be resolved?
Lot of questions are there, in fact I ended up with more question thaan when I begin the project. The main quetsions are.
What is the best voltage range.
What's the best capacitor value, or pulse energy.
What's the best di-electric to be used, many people suggested me transformer fluid or mineral oil as a cheap alternative, but may also need filtration units, oil
pump etc.
How to sense/mesure the gap accurately.
what will happen when?
As of 8th July, end of Fab Academy, you have seen what I have done, more things will happen in future. First of all I need to take my time to develop a decent board, do not want to
hurry and blow up components.
what have you learned?
I have learned a lot, for example I have used the following techniques for my project.
Machine design
Moulding and casting
3D/2D designing
3D printing
Electronics production, design and embedded programming
I have also learned a few important things, about time management, I realized that I shouldn't have chosen such a complicated project if I had only just a over a month of time. I complete
underestimated the complexity.